HLT V1.1 Build Tutorial
The following photo tutorial will help guide you through the HLT build process.
BEFORE YOU BUILD- Thoroughly wash all metal and glass parts with iso to remove oils and other contaminants
- Be sure to remove the ink on the base of the lamp
- Have scissors, a pair of cutters or nail clippers, a small screwdriver, and a tray on hand
- When trimming or cutting parts, it is always wise to err on the larger side. You can always remove more material, but you can't put it back.
- Metal foil is SHARP and can cause razor-like cuts. Wire ends can be sharp and can cause puncture wounds. Exercise care when working with or handling these materials.

Use the flat end of the Wand-Tool to seat the Proforma screen into the back of the heater core tube.
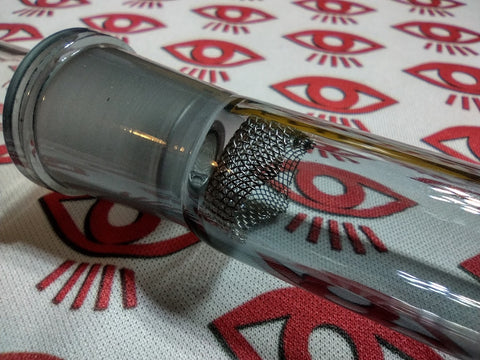
Advance the proforma screen up to the neck of the core, where it begins to meet resistance. Do not push further, this may deform the screen. At this time, put the rimmed basket screen in the joint end of the Wand-Tool and put the 18mm joints together.
You are checking the headspace to make sure there is ~1/4" or ~5mm or so of clearance between the rimmed basket screen and the proforma screen. This headspace keeps the proforma screen (and core) relatively free of debris, as well as ensuring an even heat pattern. Adjust the placement of the proforma screen as needed for this headspace. A little extra is OK. You do not want the screens mashed together in operation.

Next, Install the lamp in the socket and slide it into the core until the tip meets the screen. This is where the core-pack will sit once complete. Measure the distance between the blue lines and cut a section of foil this tall. This is your reflector. (Again it may be better to err larger and trim as needed).
The foil cannot extend past the blue line on the right, where the o-ring will be attached to the base. Be as even as you can with this cut! Hint: use a paper cutter if you have one!

Once your foil is cut, push the proforma back to the end of the core tube so the edges are sticking out.

Wrap the foil tightly around the end of the Wand-Tool and push the foil and screen back to the front of the core. The foil should stay in place from the rough edges on the proforma screen. You can tweak the screen as needed.
Alternately if you cannot get the foil to stay when removing the Wand-Tool, you can roll it and put it inside the Wand-Tool, and use a straw to push it into place while the Wand-Tool is in the core. The goal is getting the foil inside the screen.

With the lamp removed, make a "U" with the supplied SS wire, and put each end down each hole in the lamp base. Stuff the top of the wire loop under one contact (which one you choose does not matter) and pull the wire(s) down, and then outward, in the same direction of the contact (this IS important! accidentally bridging one bulb contact to the other will cause a short) The blue line represents one "side" or contact.
This SS retainer wire helps block the holes and is used to keep the o-ring in place.

Put the shielded power leads from the lamp base through the smaller o-ring, then stretch the o-ring around the shoulder on the ceramic base, keeping the SS wires to the outside/bottom of the o-ring (not through it, but under and around it).
Then pull the SS wire out and around the outside of the o-ring, and across over the the bottom of the base, twisting them together over the o-ring to secure it in place, like a bread-bag closure. Twisting this wire to braid it will draw everything tight.
Twist tighten, then use a cutter to remove any excess, and bend the braided tail down and out of the way. Leave enough of the braid behind so it doesn't come apart.
Your SS wire should only ever touch one bulb contact (indicated by blue line). The clearances between the glass and ceramic base are so narrow that the base will not fit the heater core with this wire going around it as shown in previous builds. This method also secures the o-ring far, far better, making final assembly the easiest yet.
Install the iso-cleaned bulb back in its socket. You should be able to visually verify that the foil will fit between the proforma screen and o-ring seat (indicated by red lines). This varies per bulb, so it is always cut-to-fit.

Drop the large "plunger" o-ring on the bulb assembly, and then put the leads through the flat end of the Wand-tool as pictured. Funnel/pour/scoop the beads into the heater core. A tray is recommended to keep renegade beads from escaping. You can snip the corner of the baggie and use the baggie itself as a funnel, but it is just as easy to scoop the beads out of the baggie with the heater core itself.

Push a nice long breath through the heater core to put some condensation on the interior (this helps guide the corepack along). Then gently insert and advance the corepack until the tip of the bulb meets the glass beads. Stop once you feel or hear this.

Invert everything so the joint faces straight up, and the beads fall to the base, as pictured. Be sure that the lamp is centered when you do this, and you will have exactly one layer of glass beads surrounding the widest part of the lamp.
Gently advance the corepack until the glass beads and/or bulb tip meet the proforma screen. Remove the Wand-Tool and let the plunger o-ring fall out. The core-pack is now installed.
This procedure can be repeated for disassembly and cleaning, or bulb replacement if needed.

On the power leads, twist the ends of the shields off to automatically and perfectly braid each stripped wire, then fold each one in half. Be as neat as possible here - bridged wires are most commonly found at this step. Push one lead into each side of the junction block on the DC jack, and tighten each screw until the wires are secured. Don't KILL it, but do snug it right down. Visually inspect this step to be certain there are no stray bridges.

Reinstall the rimmed basket screen into the joint end of the Wand-Tool. This is now your oven + mouthpiece. Load the biological sample in the basket screen when ready to be heated, and assemble the joints.

Great job! Save the plunger o-ring for any future corepack maintenance (replacing the bulb or doing a clean+repack).
Recommended starting voltage for this build is 5.00. Adjust by +- .05v as desired. This core takes about 10 minutes to reach thermal equilibrium from cold, and about 1-2 minutes to respond to a temperature adjustment, on average.
It is highly advised to get all SS parts as squeaky-clean as possible. This will reduce and may nearly eliminate all metallic odor/taste that most hot SS exhibits during its break-in period. This nuance will dissipate with a few days of regular use. Clean parts greatly reduce this issue which is largely caused by skin oils, as well as the heat-oxidation of the metal.
Keeping the quartz bulb package free of oil and fingerprint contamination will help prolong the life of the bulb. Some quartz is known to fail prematurely when contaminants cause thermal coldspotting stress.

The Heater Core, Wand Tool, and plunger o-ring can be stored in the parts bag. A generic 4"x6" (100mm x 150mm) clamshell zip case makes for great storage.

Copyright 2021 REFC Labs LLC
Project HighLighTED, The HighLighter, and its full suite of documentation, bill of materials, and design likeness are licensed under Creative Commons Attribution NonCommercial ShareAlike license.
You are free to:
- Share — copy and redistribute the material in any medium or format
- Adapt — remix, transform, and build upon the material
Under the following terms:
-
Attribution — You must give appropriate credit, and provide a link to the license, and indicate if changes were made. You may do so in any reasonable manner, but not in any way that suggests the licensor endorses you or your use.
-
NonCommercial — You may not use the material for commercial purposes.
-
ShareAlike — If you remix, transform, or build upon the material, you must distribute your contributions under the same license as the original.